Showing posts with label From a farm kitchen. Show all posts

10.28.2017

Harvest...


Three huge zucchini spent the past few days on the table in my kitchen, a gift from a family friend. They were taking off in the motorhome in a few days, looking for warm weather. I haven't made anything from zucchini for years, but the thought of zucchini bread on a snowy winter day sounded pretty good. So yesterday I finally ran chunks of unpeeled zucchini through the food processor, and froze it into 2-cup portions.

Today, 25 pounds of beefsteak tomatoes are on my kitchen table. I'll chop them in batches and cook them in my biggest cast iron skillet, adding chopped garlic and onion and seasonings, turning them into my husband's favorite pasta sauce.

9.20.2017

Winter pears...

The hot, dry summer this year brought a bumper crop of Macintosh apples, yellow plums, and winter pears. This small orchard, with trees just head-high when we moved into the farmhouse, produces more fruit than I can hope to use.


Our one pear tree was a slow bloomer, and it was years before it produced more than a handful of pears. It had been poorly pruned when small, and we had no clue how to prune fruit trees, so it was years before we knew enough to try and fix the shape of the tree. Ever since, it's done very well. I love to watch the tiny green pears grow all summer long, finally reaching full size in early October.


One of my favorite things to fix at harvest time is brie with pears. Just mix brown sugar and melted butter together, spread it over the top and sides of a round of brie, and bake until the cheese turns soft. Place the cheese on a fancy plate, surround it with slices of winter pears and tart apples, and cut a wedge out to give you access to all that yummy, gooey cheese.  My mouth is already watering.


This is the first pear in more than thirty years that matured with a shiny, red-blushed skin.

6.07.2017

Hot stoves...

Tonight was so cool... we were invited to an event at Tom Douglas' Hot Stove Society, his cooking school in Belltown. We prepped and cooked everything from salad and side dishes, to broiled Alaskan black cod and beef tri-tip, to dessert. It was a great experience, working side-by-side with talented chefs, using commercial-grade equipment.


When everything was ready, we gathered around two huge tables in the kitchen, and ate what we prepared. With good wine and excellent company, it made for an amazing meal.


1.25.2016

Fresh dill...

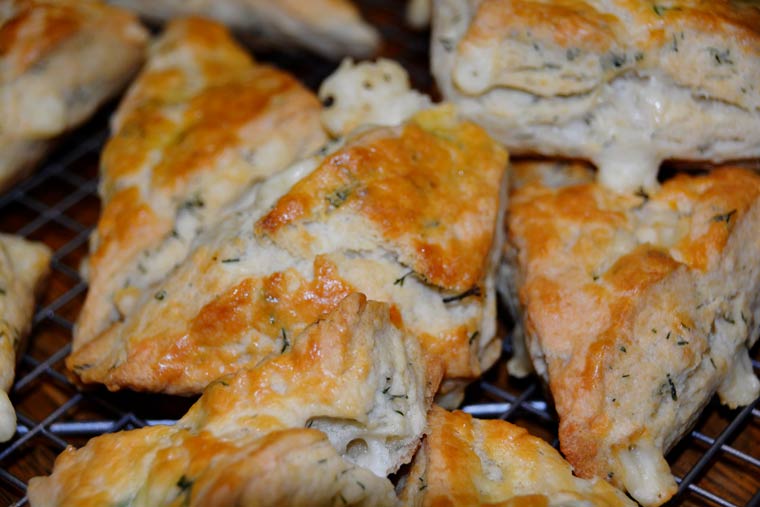
In winter, a dry day means a baking day. A pile of ingredients, a couple of dirty bowls, lots of flour on the counter, and therapeutic kneading led from this...


to this.


They're not only beautiful, they're wonderfully tasty and satisfying. Cheddar-Dill scones and cabbage soup for dinner!

2.27.2015

Channeling the 1940s today...

When I went down to the basement to start the laundry today, I realized that the best light in the house (for the next half hour, at least) was in this corner that gets light from two sides. So I turned my back on the laundry, and brought down a vase of red roses and a couple of favorite things from my farm kitchen.


WayRite kitchen scale (in my favorite 1940s Nile green) : Screen-printed vintage tablecloth 

1.26.2015

Cookbooks...

A friend of mine started an Instagram "play-along" this year, and as my personal winner of the who-owns-the-most-cookbooks contest, Cathy is the perfect person to do this. It's easy enough: cook from the cookbook she chooses for each month, or choose one of your own favorites. Then just post photographs and comments in Instagram when you cook from the book.

I chose this one, which is full of healthy recipes using ingredients from Trader Joe's. You don't need to run out and buy everything from TJ's of course... just use the ingredients list as a guideline.


For dinner on this rainy winter day, I made one of my favorites: "Creamy" Red Pepper-Basil Pasta. It's quick and tasty, and a full recipe will feed us for two nights... I like that.

You heat up the sauce ingredients while the pasta cooks. I increase the quantity of green peas, 'cause I like them. And I always add a few sliced fresh mushrooms. Or sauteed chanterelles from the freezer, if I have any left. You could also add leftover meat, like some chopped chicken or pork.


When the pasta is at the al dente stage, strain it then pour the pasta into an oven-proof dish. Pour the sauce over the top and swish it to distribute it evenly, add grated or shredded cheese on top, and bake it for 20-25 minutes. Yum.


If you want to follow along on Instagram, just do a search on #nowshecooks.

12.31.2014

Twenty-three degrees


It was chilly cold when I got up this morning, fed the cat, and put the kettle on for tea. The house was quiet and so was the morning outside my windows. I laid a fire in the wood stove, fixed my tea, and settled down with the Tom Clancy I've been trying to finish, Command Authority. The sun came up on a glittery, frosty world... the day will be a beautiful one.

I think a drive into the foothills will be on my list today... this may be my last chance to take out the MX-5 this winter, so I should take advantage of a drive on the back roads and some time with my camera.

It's New Year's Eve... how did we get to the last day of the year so quickly?

12.15.2014

Comfort food...

Winter brings it out in me, the need to be in the kitchen, stirring pots of soup and pasta sauce on the stove. Warm food for weekday meals in the coming weeks. I think it's a memory activity, from the couple of years we had a huge garden and the tomato harvest numbered in the thousands. And eggplant and cabbage, lettuce and snap peas, carrots and celery... the perfect ingredients for soups and big cast-iron pots of vegetables and lots and lots of pasta sauce.


Today that garden, if I were to plant one, would also include Brussels sprouts and beans and onions and garlic. And it would still have tomatoes... lots and lots of tomatoes.

In some ways I miss having a garden. But as long as there are farm stands, I can still cook with produce picked the same day, from a farm just down the road. And that's almost as good.

11.18.2014

Huevos in a bowl

Huevos Rancheros is one of my favorite breakfast meals. I've learned ways to make this dish healthy, but while staying on Henry's Fork in Idaho recently, I learned how to make it easy to eat:  just use a bowl.

Layer your favorite Huevos ingredients on top of 2-3 crisped tortillas in a big bowl, and top with cilantro and a slice or two of avocado. I like to add a couple of strips of bacon on the side, but you could also grill up some chorizo. Yummy.


Oh, and if you can, find a sunrise to reflect in the edge of the bowl. Your breakfast will be even better.

8.15.2014

A year ago | The great blackberry pie experiment

The berries on the farm were late this year... by the first of August last year, we were picking them daily. Dave picked his secret patch of native berries, the small ones that grow on ground-hugging vines. They're yummy.

Finally the warm weather worked its magic and the berries came into production mode. Enough to pick for my morning cereal... but I love it when there are plenty of berries to freeze for pies and cobblers during the winter months.

Last year Dave and I narrowed down a bunch of blackberry pie recipes to two, and I blended the two recipes together into what I hoped would end up being the perfect sweet, not-too-runny, blackberry pie. It was a hit with the family, and it's now my favorite pie recipe.

Blackberry pie... oh, my!

We all picked berries today... actually, we picked and ate. No berries made it into the house to be used in a pie. But I'm not worried; tomorrow is another day and there are a couple of acres of berries to pick!


Pennylane Farm Blackberry Pie

6 cups (1 3/4 pounds) blackberries (use 8.5–9 cups for 10-in. deep dish)
1 cup sugar
3 Tbl flour
3 tsp tapioca
juice and zest from a lemon (1 tsp juice and 1/2 teaspoon zest)
2 tbl butter, diced

Make pie dough for a double-crust pie, form into flattened rounds, wrap in plastic wrap, and put in the refrigerator for at least 30 minutes. Everyone has their favorite, so I won't include one here. My favorite is from the Martha Stewart Cookbook.

Preheat the oven to 400 degrees with a baking sheet on the middle rack.

Place the berries in a generously large bowl and sprinkle with lemon juice and lemon zest. Make sure there's enough room to comfortably stir the ingredients together.

Mix the sugar, flour, and tapioca together, then add to the berries. Toss gently, and let stand for 20 minutes. Stir the mixture occasionally; this helps extract some of the juice.

Roll out the bottom crust and place in the pie plate. I like to roll up the dough on my rolling pin, which makes it easier to move the crust without damage. Trim, leaving a half inch overhang. Spoon the blackberry mixture into the pie shell.  Dot the top with the butter.

Roll out the top and place on top of the pie. Trim, fold the edge under the bottom crust, and crimp the edges together. Pierce the top to make steam vents.  If you wish, lightly beat an egg with a tablespoon of water and brush on the top and edge of the pie.

Place the pie on the hot baking sheet in the oven and bake until the filling is bubbling, 45 minutes to 1 hour. If the crust browns too quickly, cover it with foil and continue baking. Let the pie cool before serving.

12.09.2013

Sharing the kitchen

We made a chef salad tonight, standing side-by-side at the kitchen counter, chopping lettuce and carrots, tomatoes and celery and zucchini, slowing filling up my big Polish pottery salad bowl. "How much of this do you want?" he asked. And "should I include the celery leaves?" I added leftover chicken from last night's dinner, and a can of Albacore tuna, and set the bowl aside while his garlic bread heats in the oven.


He's doing more of the cooking now, fixing breakfast on the days we don't have cereal, and wandering out to the kitchen when it's time to think about dinner, interested in the process. We talk about menus and grocery lists, and he does some of the shopping. He loves Trader Joe's, and I can always count on a phone call (or two) when he's there. At first he just bought the list I sent with him. Now he browses the shelves on his own, reads the labels, finds yummy (and healthy) food to bring home.

I'm happy about his new-found interest in cooking and food, and I love that after nearly 39 years of marriage, we've managed to find something else to share.

11.15.2013

Apple Slices: the recipe

A couple of weeks ago, I wrote about my husband's favorite dessert. You can read the story here.
I made a pan to take to our family weekend at the lake, and my niece said that while she enjoyed reading the story of the family recipe, she was hoping for more. Like maybe the recipe!

So here is my slightly modified (and, I think improved) version of the family recipe. The recipe calls for a 9x13 cake pan, but my husband prefers a thinner version made in a jelly roll pan. And the original had a simple cinnamon-sugar mixture, but I prefer the more flavorful mixture from my favorite apple pie recipe, which comes from old Williamsburg, Virginia. I think it perfectly complements the apple flavor.

Next time I make a pan of these, I'll post a photograph. I hope you enjoy our favorite autumn dessert.


Pastry
2 cups flour
1/2 teaspoon salt
2/3 cup shortening
2 egg yolks
1 tablespoon lemon juice
1/4 cup water

Filling
5-6 tart apples, sliced
1 tablespoon lemon juice
¾ –1 cup sugar
2 tablespoons flour
1/2 teaspoon cinnamon
1/4 teaspoon freshly grated nutmeg
1/4 teaspoon cloves
1/4 teaspoon mace

Frosting
1 cup powdered sugar
2 tablespoons butter, softened
½ teaspoon vanilla
2 tablespoons milk

Preparation

You'll need either a 9x13-in. cake pan, or a 10x15 in. cookie sheet with sides.

Sift flour and salt and cut in shortening. In a separate bowl, mix the egg yolks, lemon juice, and water. Add to the flour mixture and mix well. Divide the dough into two pieces, one slightly larger than the other; wrap each in plastic wrap and refrigerate while you slice the apples.

Slice apples into a 2-quart measuring pitcher or large bowl. If you're making the baking pan version, you'll need about 7 cups of sliced apples. If you're making the cookie sheet version, you'll need about 5 cups. I like this recipe with Honey Crisp apples, but you can also use any tart pie apple, such as Granny Smith or Macintosh.


Remove the dough from the refrigerator. Roll out the larger piece into a rectangle, then use it to line the bottom of the pan. Layer sliced apples over the dough.

In a small bowl, mix the sugar, flour, cinnamon, grated nutmeg, cloves, and mace. Sprinkle over the apple slices.

Roll out the second piece of dough and lay on top of the pan. Seal the edges to the bottom crust, then cut steam vents. Bake at 400°F for 30–40 minutes.

In the meantime, mix the frosting ingredients and set aside. Let the pastry cool slightly, then spread with the frosting. Let cool completely before cutting into bars. Store in the refrigerator.

I like to serve these with caramel or dolce de leche ice cream. Yummy!

10.29.2013

Apple slices

Last weekend we came home from Ellensburg with a box of Honey Crisp apples. They're in cold storage, waiting for all sorts of yummy desserts to come from them. Of all the apples we grow in the state, this is my favorite. It has firm white flesh and a tart flavor, with just a hint of sweetness. Perfect for eating, and it's just as good in recipes.

Today was baking day: so many cloudy days in a row have brought out my nesting instincts. Dave requested apple slices, his favorite childhood dessert. This is one of the recipes my mother-in-law shared when I wrote the Pennylane Farm cookbook years ago, and I remember how the recipe card was yellowed and stained from age and use. She told me that she no longer remembered where the recipe came from, so Dave did some research. He found similar recipes of the same name that are German in origin, and linked to Chicago. So we're pretty sure the recipe belonged to Dave's great-grandmother.

As a child growing up in the windy city, Marion spent every afternoon with her German grandmother. She speaks warmly of the woman who loved her completely, and who taught her how to cook. I like to think that this much loved recipe has now been passed down through five generations.


10.24.2013

Chanterelles

One bonus that came with our lake property and cabin near Hood Canal: mushrooms! I didn't even know that chanterelles existed here, until our neighbor told me about them, then took me out and taught me how to find them. I would cut a few each year and cook them, or share them with my sister. Just think of all those mushrooms gone to waste... or to my neighbors. No worries. There are plenty to go around, and everyone always shares.

This year the mushrooms came early, and in abundance. So for the first time, I actually went mushroom hunting outside of our own property. I did a bit of research first, to try and identify some good places to look. I learned that chanterelles love moss (knew that) and salal (didn't know about this relationship). Both are everywhere in the woods around Hood Canal. So are trees and hard-to-climb-over huckleberry bushes, downed trees and branches, gullies and hills, and shrubby ponds with standing water. Lots of things to make it hard to walk through the woods.

But I set out anyway with my friend Linda, armed with some tips from my neighbor. We did pretty well, considering all of the aforementioned pitfalls of a walk through the woods. But in the end, we found the most mushrooms around the well house on our property. This small shingled shed is in a small clearing that has grown over with moss and edged by salal, and underneath moss and shrubbery we found lots of the elusive chanterelles.

We each brought home a bag full. I set mine out on paper towels in the sun to dry slightly, then brushed them clean of dirt (a soft pastry brush works great), sliced them into thick slices, and sautéed them. Then I set them on paper towels to cool, and packaged them in ziplok bags small batches to freeze. They'll be perfect in recipes this winter, when mushroom hunting is just a memory.


This is about 3 pounds of chanterelles. and the largest ones are about 4 inches across. Gorgeous, aren't they? I found a couple that were about 7 inches across, the largest I've ever seen. They'd been rained on and were past their prime, but I brought them home and used them to seed a mossy area near the cabin.

9.08.2013

Winery tiles

I love these stone winery tiles. We use them as coasters throughout the house, and I like to arrange them on the sideboard and use them to hold wine bottles during a party. They're a nice way to display the bottles we'll be sampling, and they also protect the wood from damage.

The tiles were a big deal a few years ago, now they're getting harder to find. Glad I collected them when I did.

9.06.2013

Silkscreened olive oil bottles

I have this cool antique Coca-Cola(R) box, one of those wooden crates with separate cubbies for twelve glass bottles of Coke(R). It sits on the library table in the middle of my farmhouse kitchen, and holds olive oil and balsamic vinegar, dipping oils and sauces, and one gorgeous ceramic oil bottle with a French town scene painted on it. And which, unfortunately, I can't use because it leaks. Sigh...

But I digress.

I used to buy the big plastic bottles of olive oil from Costco, the kind you can't hope to use up before it starts to go south. I kept the extra bottle in my pantry in the basement, where it's cool and dark. But I recently read that plastic is not the optimum storage container for olive oil, and clear plastic that lets in light is even worse.

Also in my cool, dark pantry is a wide shelf that holds empty silkscreened wine bottles that I've saved over the years. I love these bottles, and now they have new life: to store olive oil. Pour tops for oil bottles are easy to find, and when I buy oil in a bottle that won't fit in my box, or that comes in a clear bottle, I decant it into one of these dark green wine bottles.


Of course, storing my olive oil in the wine cellar would be the best place, as the year-round 55 degree temperature will help keep the oil from degrading. But it's not exactly handy for cooking. As long as I buy only premium extra-virgin olive oil (which lasts longer, and is best if kept at room temperature), keep an air-tight cap on it, and use it within a reasonable timeframe, it's OK in my kitchen.

9.04.2013

Canning jar cork holder

Years ago I found a few big canning jars at a yard sale, and they've been perfect for making sun tea. Big enough to make it worth my while, small enough to fit in the refrigerator alongside the milk. And in a tiny junk store in Curlew a few years later, I found a box of aluminum jar rings with dog bone openings, with matching glass seals.

I was packing away my sun tea jars today, and it dawned on me. Canning jar + aluminum ring - glass seal = the perfect display jar for wine corks.

The jar sits on a stool next to the sideboard in my farmhouse kitchen, where we serve wine. Pull the cork, drop it through the opening in the lid, simple.

Finding uses for my collection of old canning jars is always a good thing, and the look is perfect for my country kitchen. Doesn't get better than that.

4.14.2013

TLC for wooden spoons

It's one of those things I don't think about often:  a little TLC for my wooden spoons. But today I was reading some of my favorite blogs, and came across a post about just that. Hmmm... wonder how mine look?

So I put my computer aside, and went out to check on the health of my own kitchen utensils. I dug in the drawers and raided my utensil crocks, and found quite a few. Wooden spoons in oak, bamboo, and mystery wood. A couple of spatulas with beautiful dark wood handles. Pastry brushes. A couple of wire mesh strainers. I also pulled out my big wood cutting board, and a small game board that I use when serving wine. I laid everything out on my kitchen work table, and gave them a careful look. Pretty much everything needed to be oiled, and the mystery wood spoons needed to be sanded.

You'll need a piece of extra-fine sandpaper, mineral oil, a small ramekin, and a roll of paper towels. First, I sanded the rough patches on my wooden spoons, then wiped them with a lightly oiled towel to remove any wood dust. Don't use a wet towel; you'll just raise the grain again.

Since I like to use my fingers to oil the wood, I pour a little oil into the ramekin. Then one at a time, I carefully rub oil into the wood. You don't want (or need) to use a lot of oil; just be sure you get all the dry places.

Set everything aside to dry for a few hours, then wipe each piece using a clean towel. I like to remove the excess oil with paper towels, then make a final pass using an old dish towel.

Here's my pile before, looking all dry and neglected:


And here are my spoons and cutting boards after their beauty treatment. Don't they look better?


2.21.2013

Fresh squeezed

I bought a bag of Cara Cara oranges at Costco last weekend, thinking some natural Vitamin C would be a good thing during our gloomy winter. But neither of us cared much for the flavor, and they were a bit mushy. So I decided to juice them instead.

I do it the old-fashioned way, using a glass juicer from the 1960s. And this small Polish pottery pitcher is the perfect size for juice for two. The orange husks will go into the freezer; my favorite chocolate chip cookie recipe uses orange zest, plus orange juice instead of vanilla. Yum!

Isn't the juice a beautiful color?


7.25.2012

Out of Milk

Have you come across this app yet? I was searching for food & cooking related apps for my new Android smartphone (my first), and it is so cool!

Out of Milk is an electronic shopping list, which is really handy. But even more helpful for me is that you can also use it to inventory just about anything that you use (and use up). Pantry, spice rack (or in my case, spice cupboard; I outgrew my wedding gift spice rack about 25 years ago), refrigerator, even your bathroom toiletries. Just create any custom list you want, enter each item and the quantity on hand, and you've got an inventory. It even has a handy bar code reader to make things easier. For the pantry, I can track the number of items I have on hand. For the spice cupboard, I can actually track how much is left of any item, either by a sliding scale (half left, or almost empty) or by actual ounces.

It took me about 3 hours to build inventory lists for canned goods, staples (flour, sugar, etc.), herbs/spices, and condiments… time well spent. I got to test it last night when we made a trip to Trader Joes on the way home from dinner. I picked up the few things I knew we needed, and Dave browsed. Every time he came up with some bottle or jar in his hand, I could tell him whether we already had it in the pantry (or refrigerator), and whether we needed a spare. How cool is that?

The shopping list and inventory lists are linked, too. If I enter shampoo on my shopping list, it will show me a list of all the shampoo items in the inventory, so I can choose which I need to buy.